Как исправить ошибки KERNEL_SECURITY_CHECK_FAILURE типа "синий экран" (0x00000139). Как исправить ошибки KERNEL_SECURITY_CHECK_FAILURE типа "синий экран" (0x00000139) Проверяем системные файлы
Last updated on April 11th, 2018
The KERNEL SECURITY CHECK FAILURE blue screen error can occur on Windows 10 or 8 based computers, after a Windows or a driver update. Additionally, the error may appear at the end of the Windows 10 or 8 setup process (fresh Windows installation).
The symptoms of the blue screen problem "KERNEL SECURITY CHECK FAILURE", is that Windows crashes randomly or crashes during the boot process, making it impossible to enter at Windows environment. From my experience, I suppose that the above BSOD error is related to hardware or software incompatibility issues.
In this tutorial you "ll find detailed instructions to resolve the boot error "KERNEL_SECURITY_CHECK_FAILURE" in Windows 10 or Windows 8/8.1 OS.
How to FIX BSOD ERROR: KERNEL SECURITY CHECK FAILURE.
Notes before troubleshooting the "KERNEL SECURITY CHECK FAILURE" issue, by following the methods below:
1.
If you face the "KERNEL SECURITY CHECK FAILURE" problem, after upgrading your system (e.g. you have added more RAM or you have replaced the VGA adapter or another component), then probably this is the reason of the blue screen problem.
2.
If you face the "KERNEL SECURITY CHECK FAILURE" error, after a Windows update, then .
3.
Make sure that your system is clean from viruses and malicious programs, by following this guide: .
4.
Install all available Windows updates.
5.
If you can login to Windows normally or in , follow the instructions in .
6.
If you cannot login to Windows (Windows fails to boot), then read the instructions at .
7.
To make your life easier, .
Part 1. Fix BSOD KERNEL SECURITY CHECK FAILURE using Windows Environment.
Method 1: Force Windows to Full Shutdown.
Perform a full shutdown of your system in order to re-initialize Windows at boot. To do that:
1. Click at the Power button and while holding down the SHIFT key on your keyboard, click Shutdown .

2.
Power ON
your computer again.
3.
Check if the "BSOD KERNEL SECURITY CHECK FAILURE"
problem has resolved. If it does, then permanently.
Method 2. Perform a Clean Boot.
The second method to resolve the "KERNEL SECURITY CHECK FAILURE" blue screen error, is to load Windows with the minimal set of drivers and programs in order to find out if a device driver or program cause your system to crash. To perform a clean boot:
1.
Press Windows
+ “R
” keys to load the Run
dialog box.
2.
Type and press Enter
to open System Configuration utility.

3. At Services tab, check the Hide all Microsoft services checkbox and click the Disable all button.

4. Then select the Startup tab and click Open Task Manager .

5. Select one by one all startup programs and click Disable .

6.
Close
Task Manager.
7.
Press OK
at System Configuration utility and restart
your computer.
8.
If after the restart, your computer is working without problems, then probably a device driver or a software that was running at Windows startup, caused the problem. At this case, run the System Configuration utility again and enable one-by-one the disabled programs and services (and restart), until you find out which one caused your system to crash.
Method 3. Rollback or Update the Driver for the Display Adapter (VGA).
Commonly the "KERNEL SECURITY CHECK FAILURE" error happens after updating the driver for your display adapter driver or because – at fresh Windows installations – the correct display driver is not installed. To resolve these problems:
1.
Press Windows
+ “R
” keys to load the Run
dialog box.
2.
Type and press Enter
.

3.
In device manager, expand the Display Controllers.
4.
Right click on the installed Display Adapter * and select Properties
.
* Note: If you see here a "Standard Microsoft Display Controller", then download and install from the manufacturer"s support website, the latest drivers for the display adapter.

5. Select the Driver tab and perform the following actions:
a. If the button is active, then press it to rollback to the previous version of the display driver.
b. If the button is inactive (like in screenshot below), then navigate to VGA manufacturer"s support site to download and install an older driver version for your display adapter.

6. If any of above steps, doesn"t resolve the KERNEL SECURITY CHECK FAILURE blue screen issue, then completely uninstall the display adapter from your system and reinstall. To do that:
a. Click the "" button.
b. At the warning window, check first the "Delete the driver software for this device " checkbox and click Uninstall .

7.
Restart
your computer.
8.
After the restart, proceed and reinstall the necessary driver software for your VGA device.
Method 4. Scan & Repair Windows System files.
1. Open Command Prompt as Administrator. To do that:
a. In the Search box type: cmd (or command prompt ).
b. Right click on the command prompt (result) and select Run as Administrator .

2. In the command prompt window, type the following command & press Enter :
- sfc /scannow

3
.
Wait until Windows scans and repairs the system files.
4.
When the System file check and repair is completed, restart your computer and check if your computer works smoothly.
Method 5. Check and Repair File System with CHKDSK.
Then next step is to check the hard drive for problems by using the CHKDSK command. To do that:
1.
Open an Command Prompt as Admin.
2.
In the command prompt window, type the following command* and press Enter
:
- C : /f /r

3. When the CHKDSK command operation is completed, restart your system.
– if none of the above methods solved the problem, then navigate to .
Part 2. Fix BSOD KERNEL SECURITY CHECK FAILURE using Windows Recovery Environment.
If you cannot boot to Windows, then you have to start from a Windows installation media to resolve the blue screen problem. If you don"t own a Windows Installation Media, then you can create one (corresponding to your Windows Edition and Version) directly from Microsoft .
Method 1. Run Startup Repair.
1.
2.
At Language options, press Next
.
3.
Select Repair your computer
.
4.
Then click Troubleshoot -> Advanced Options –> Start-up Repair.

5. When the Start-up repair is completed, restart your computer.
Method 2. Check Disk and File System for Errors.
The next method to resolve Windows startup problems is to check the disk and the file system for errors. To do that, boot from the Windows installation media.
1. At the Windows Setup screen press SHIFT + F10 to access the Command Prompt, or choose Next –> Repair your computer –> Troubleshoot –> Advanced Options –> Command Prompt .

2.
In command prompt, type and press Enter.
3.
Notice the drive letter of OS partition (e.g. "osdevice –> partition=D
: ")

4. Then give this command* and press Enter :
- D : /r /x
* Note: Replace the letter "D " according to your case.
5. When the CHKDSK process is completed, give this command: *
- sfc /scannow /offbootdir=
:\windows
* Replace the "
- sfc /SCANNOW /OFFBOOTDIR=D :\ /OFFWINDIR=D :\windows
6. After SFC scan, type exit to close command prompt window and reboot your computer.
Part 3. Other Methods to resolve the KERNEL SECURITY CHECK FAILURE on Windows 10.
Method A. Perform a System Restore.
1.
Boot your computer from the Windows installation media (DVD or USB).
2.
At Language options, press Next
.
3.
Select Repair your computer
.
4.
Then click Troubleshoot -> Advanced Options –> System Restore.

6. Select an earlier working state* and click Next .
* Note: Check t he Show more restore points checkbox, to view all available restore points.

7. Finally,
review your selection and if you agree, press Finish
and then Yes
.
8.
Now wait until the restore process is completed. During the restore process, your computer will restart several times and when it"s done, you should enter in Windows without problems.
Method B. Modify SATA Mode in BIOS Settings.
1. Power On your computer and press the appropriate key (DEL or F1 or F2 or F10 ) to enter BIOS settings. *
* Note: The way to enter into BIOS Settings depends on the computer manufacturer. To Enter into your BIOS Settings, pay attention at the first screen as your computer starts and try to find a message like this:
"DEL to enter setup"
"Press ESC to Enter Setup"
"BIOS Configuration: F2"
"F10 to Enter Setup"
2. Load Default Settings (Load Optimal Defaults)

3. Then look on all BIOS screens for a setting named or SATA Mode or SATA Controller Mode or SATA Operation or Configure SATA as . (This setting is commonly found under the Advanced section).
4. Make sure that the SATA Mode (Type) is set to AHCI and NOT in RAID .

5. Save Changes and Exit BIOS Settings and try to boot on Windows.

That"s it! Let me know if this guide has helped you by leaving your comment about your experience. Please like and share this guide to help others.
If this article was useful for you, please consider supporting us by making a donation. Even $1 can a make a huge difference for us in our effort to continue to help others while keeping this site free:
If you want to stay constantly protected from malware threats, existing and future ones , we recommend that you install Malwarebytes Anti-Malware PRO by clicking below (we do earn a commision from sales generated from this link, but at no additional cost to you. We have experience with this software and we recommend it because it is helpful and useful):
4 easy fixes for the Kernel Security Check Failure error in Windows 10
If you’re seeing the blue screen of death error Kernel Security Check Failure on Windows 10 , don’t worry. Here are 4 ways for you to try. Just choose an easier way and follow the instructions step by step to fix the problem .
You’ll need to be logged into Windows on the problem computer to try any of these solutions. If you can’t log into Windows, power on and off your PC 3 times to perform a hard reboot and , then try these solutions.
1: Undo recent changes
One of the causes of the blue screen error could be recent changes you’ve made to your system. If you’ve added new hardware or software to your system recently, remove them to see if the problem is fixed.
2: Update available drivers
This blue screen of death error is very likely to be caused by incompatible drivers. You should verify that all your devices have the right driver, and update those that don’t. There are two ways you can get the right drivers for your hardware devices: manually or automatically.
Manual driver update – You can update your device drivers manually by going to the manufacturer’s website for your hardware devices, and searching for the most recent correct driver for each. Be sure to choose only drivers that are compatible with your variant of Windows 10.
Automatic driver update – If you don’t have the time, patience or computer skills to update your device drivers manually, you can, instead, do it automatically with . Driver Easy will automatically recognize your system and find the correct drivers for your exact video card and monitor, and your variant of Windows 10, and it will download and install them correctly :
1) and install Driver Easy.
2) Run Driver Easy and click the Scan Now button. Driver Easy will then scan your computer and detect any problem drivers.

3) Click the Update button next to all flagged devices to automatically download and install the correct version of their drivers (you can do this with the FREE version).
Or click Update All to automatically download and install the correct version of all the drivers that are missing or out of date on your system (this requires the which comes with full support and a 30-day money back guarantee. Y ou’ll be prompted to upgrade when you click Update All).

3: Run Memory Diagnostic tool
If the above methods fail to help you solve the problem, you should check if your RAM is at fault. You can check the status of RAM by:
Windows logo key and R at the same time to invoke a Run command. Type mdsched.exe in the run box and press Enter .

2) You could choose Restart now and check for problems(recommended) to check the status of your memory card right now, or choose Check for problems the next time I start my computer if you are too occupied now.

3) You will be seeing this page showing the progress of the check and number of passes it will run on memory.

If you don’t see any error here, it’s likely that your memory card is not causing any issues. If error is detected, it is suggested that you exchange the current memory card for a new one.
4: Scan Hard Disk for Error
Another cause of this blue screen error is faulty hard drive. You should check if you need to get your hard drive replaced:
IMPORTANT : Please make sure you have closed all open programs and files before your disk check.
1) On your keyboard, press the Windows logo key and E at the same time. Click This PC .

2) Right-click the hard drive that you want to check and click Properties .

3) Go to the Tools tab and click Check option.

4) If your hard disk drive is problem free, you will see the notification like this:

If you don’t see this notification, please consider buying a new hard disk drive to get this problem solved.
Kernel security check failure – критическая ошибка, возникающая в некоторых случаях на синем экране (он же BSoD) при работе системы.
Причину обычно определить сложно, их может быть большое множество. В версии Windows 10 к ошибке начала прилагаться определенная поясняющая информация, что немного облегчило её устранение. Выделим наиболее частые причины , вызывающие данный сбой:
- Проблема с установленными или отсутствием необходимых драйверов.
- Битые файлы системного реестра.
- Конфликт какого-либо ПО с используемой версией BIOS.
- Аппаратные неполадки компьютера (перегрев, повреждение компонентов).
Устранение неисправности
Достоверно установить причину скорее всего не удастся. Поэтому поэтапно применяем возможные методы устранения сбоя, один из которых вероятно поможет в этом случае.
Сканирование на ошибки
Прежде всего надо просканировать жесткий диск на наличие ошибок, сбойных секторов.
Можно использовать специализированные утилиты (Victoria HDD, HDD Scan, Seagate SeaTools и др.), а можно ограничиться применением штатных средств системы, что будет значительно менее эффективно.
Но все же попробуем. Для этого в проводнике отрываем свойства
и вкладку Сервис
того локального диска, который необходимо проверить.
Еще один способ сканирования – в командном интерпретаторе, запустите команду chkdsk /f C:,
а затем Y
для подтверждения выполнения проверки после перезагрузки.
Из стороннего ПО порекомендуем использовать Victoria for Windows
.
Здесь можно получить много разной информации о Вашем жестком диске. Для получения картины, описывающей его состояние, перейдите во вкладку Test и пройдите тестирование, предварительно установив флажок Remap для одновременного восстановления битых секторов.
Проверяем системные файлы
Если проверка жесткого диска не дала результата, проводим сканирование файлов системы
. Команда sfc
/scanow
в консоли от имени администратора.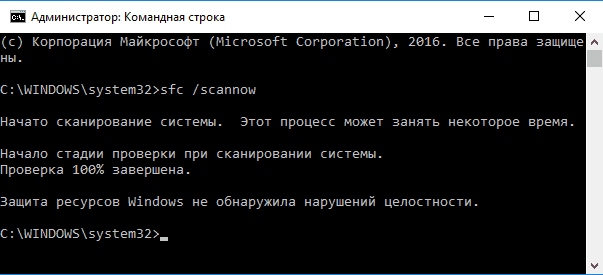
Утилита проведет восстановление поврежденных файлов, если это возможно.
Проверка оперативной памяти
Далее тестируем оперативную память на наличие ошибок. Часто именно это даёт эффективный результат. Опять же, тестирование можно провести штатными средствами системы с малой вероятностью положительного решения.


Встроенное средство диагностики проверит компьютер на предмет ошибок RAM
.
Порекомендуем использовать популярную утилиту Memtest86+
.
Если ошибки обнаружатся, то проще всего будет заменить сбойный модуль RAM.
Обновляем драйвера
Возможно потребуется обновить драйвер
Вашего видеоадаптера. Вызываем диспетчер устройств
и в свойствах своей видеокарты жмем обновить драйвер
, далее подгружаем актуальный из интернета или скачиваем и устанавливаем его самостоятельно.
Восстанавливаем реестр
Повреждения реестра лучше устранять с помощью специальных программ наподобие Ashampoo Optimizer
или CCleaner
.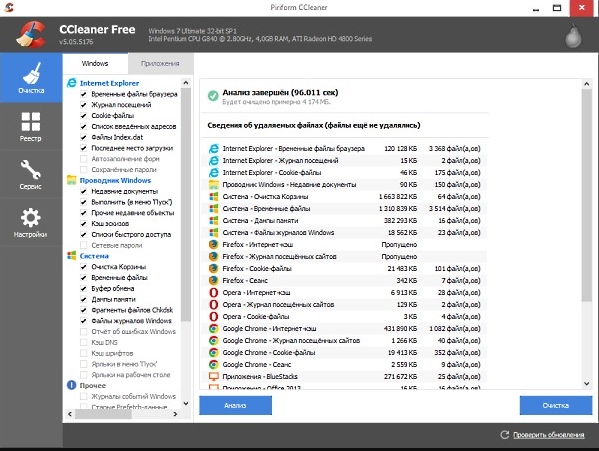
Они проведут необходимые исправления и очистку от накопившихся в системе мусорных файлов.
Если предложенные меры Вам не помогут, то из программных решений ошибки остается вариант полной переустановки системы.
Хочу разобрать очередную ошибку, которая относится к критическим в операционной системе Windows. Так я ее назвал, потому что ошибки BSoD (синие экраны смерти) всегда критичны. Самое интересное, что часто сразу выявить причину не выходит, так как их может быть огромное количество.
В данной статье мы будем рассматривать ошибку Kernel Security Check Failure Windows 10. Вообще, ошибки подобного рода в Windows 10 имеет более информативный характер, то есть там написано, что нужно делать, а еще система сама попытается ее исправить. К сожалению, ошибку KERNEL SECURITY CHECK FAILURE придется исправлять самостоятельно.
Как исправить синий экран смерти Kernel Security Check Failure?
Эта ошибка еще имеет код 0x00000139, может быть эта информация поможет вам в решении проблемы. Итак, причинами SECURITY CHECK FAILURE могут быть следующие моменты:
- Устаревшие версии драйверов, либо была произведена установка последней версии, которая привела к конфликту в системе.
- Поврежден реестр.
- Вы установили приложение, которое конфликтует с системой или BIOS.
- Что-то случилось с компонентами компьютера, например, физическое повреждение.
На самом деле эти причины не единственные, их гораздо больше, но все их здесь перечислить не получится.
Исправляем
Так как определить ошибку по-хорошему не выходит, мы можем применять только действия, которые в принципе могут устранить ее, например, через безопасный режим удалить драйвер, возможно, виновный в появлении BSoD.
Хочу напомнить, что у меня есть статья на тему , который позволяет выявить причину ошибки. Если система не запускается, то проделывать процедуру придется в . Прочитайте эту статью и скорее всего вы определите, кто виновник «синего экрана смерти».
Проверка диска на ошибки
В этом случае системная утилита проверить жесткий диск на наличие проблем и попытается их устранить, либо появится сообщение, что их нет.
Откройте командную строку от имени администратора, для этого нажмите по меню Пуск правой кнопкой мыши и выберите там соответствующий пункт.
Введите там команду: chkdsk /f C:

В том случае, если у вас не один накопитель, то придется применять команду к каждому. После этого вы перезагружаете компьютер начинается проверка, которая может быть довольно длительной.
Проверка системных файлов на целостность
Ну тут из заголовка понятно, что мы будем делать. Нам также понадобится командная строка, в которую нужно ввести эту команду:
sfc /scannow

Если все будет нормально, то команда строка скажет об этом, если есть поврежденные файлы, то система попытается их восстановить.
Проверка оперативной памяти
Бывают случаи, что Kernel Security Check Failure появляется из-за ошибок в ОЗУ. В этом случае можно сделать следующее – вытащить по очереди модули памяти по одному и проверять работоспособность системы. Если все нормально, то попробуйте . Перейдите по ссылке, чтобы прочитать об этом статью.
Проблемы с реестром
Причиной может быть и реестр, который был поврежден самим пользователем, либо вирусами. Конечно не всегда изменения в реестре могут выявить такую проблему, но есть и вот такие случаи. Вам нужно попытаться , но перед этим вам нужно было делать резервную копию. Хотя в Windows 10 они уже есть, поэтому волноваться не стоит. Как восстановить реестр написано здесь.
Проблемные драйвера
Хоть этот пункт и является почти последний, он не менее важен. При обновлении драйверов видеокарты или другого устройства с большой вероятностью вы получите ошибку Kernel Security Check Failure. Либо же ошибка моет появляться из-за старой версии. Поэтому здесь два варианта, как поступить – обновить драйвера до последней версии, либо откатить их на версию или две назад.
Для профилактики вы еще можете , но это на ваш страх и риск.
Насчет физического повреждения компонентов сказать ничего не могу. Вспомните, может ноутбук или компьютер подвергался ударам, может быть у вас при отключении света выключался и компьютер, были скачки напряжения.Тогда тот или иной компонент придется заменить, например, тот же модуль оперативной памяти или жесткий диск.
Надеюсь это поможет вам в решении проблемы. Конечно, можно рассматривать и переустановку Windows, она то 100% поможет, но мало кто решиться на то действие.
Summary: Don"t worry if your computer gets the blue screen of death error due to Kernel Security Check failure issue in Windows 10/8/7. This article will provide one quick fix and 4 reliable methods to help you thoroughly fix Kernel Security Check failure with BSOD error with simple clicks. Feel free to follow fix these problems and repair your computer back to work normally again.
Kernel Security Check failure with BSOD error in Windows 10/8, help!
"Hi there, do you know how to fix the Blue Screen of Death (BSOD) error after upgrading Windows system to Windows 10 or Windows 8/8/1? I"m having this issue that both two of my computers and both of these two computers had just upgraded
into
Windows 10 and Windows 8 yesterday.
This morning, when I tried to start these two computers and then the
BIOS
error came up with the error message "Your PC ran into a problem and needs to restart. We"re just collecting some error info, and then we"ll restart for you. (10% complete) If you"d like to know more, you can search online later for this error: KERNEL_SECURITY_CHECK_ERROR". I then tried to Google the answer and it seemed that quite a lot of users are having a similar issue to me. So how can I fix this issue and get my computers out of the Kernel Security Check failure with BSOD error?
"
If you happen to have a BSOD problem in your PC due to Windows system install or update but failed with Kernel Security Check error, don"t worry. Right below, EaseUS software has collected some reliable solutions including one quick fix and 4 methods to help you effectively get rid of Kernel Security Check issue from Windows 10/8/7 PC. Just follow to see how to solve these issues with ease now.
Quick fix Kernel Security Check failure with BSOD error
Here are the steps about how to boot Windows 10/8 PC into Safe Mode:
1. Press Win + R keys to open Run dialog > Type: msconfig
and hit Enter.
2. Go to Boot option > Select Safe boot > OK.
If you want to boot into Safe Mode with the internet connection, select Network option under Safe boot category.
3. Click Restart so to boot your computer into Safe Mode now.
If the Kernel Security Check failure disappears after booting PC into Safe Mode, you need to check the offending programs in your PC or uninstall and update necessary drivers.
If the error still exists in Safe Mode, it"s very likely that the RAW or hard drive got something wrong.
Note: 1. If Safe Mode doesn"t help, you can directly boot PC into desktop and follow the offered solutions to fix Kernel BSOD error.
2. If you can"t boot PC into the desktop, try hard reboot:
- Press and hold the power button on your PC till it powers off > Restart PC by pressing the power button.
- Repeat the steps till you see Please wait comes out.
- Click See advanced repair options > Troubleshoot > Advanced options.
- Choose Startup Settings > Restart > Press F4, F5, F6 to try 4, 5, 6 options so to boot your PC into desktop.
Resolutions to fix KERNEL_SECURITY_CHECK error in Windows 10/8/7
Here in this part, you"ve three reliable methods to effectively fix and get rid of KERNEL_SECURITY_CHECK failure error in Windows 10/8/7 and you may selectively follow either one to get this issue fixed now:
Before you start, it"s highly recommended for you to do a full scan on your computer to remove possible virus or malware with anti-virus software.
Method 1. Repair System file and bad sectors that cause Kernel Security Check failure issue
Run System File Checker:
1. Type: cmd in the search box and right-click on Command Prompt > Select Run as administrator;
2. Click Yes to continue with administrator permission;
3. Type: sfc /scannow and hit Enter to check and repair corrupted system files which may cause BSOD error with Kernel Security Check failure;
Run partition manager:
If system hard drive or partition has bad sectors, Windows system won"t be able to boot normally. Instead, a BSOD error may come up.
Fortunately, powerful partition manager software from EaseUS will effectively help fix this issue with its Check Partition feature:
Step 1: Open EaseUS Partition Master on your computer. Then locate the disk, right-click the partition you want to check, and choose "Check File System".

Step 2: In the Check File System window, keep the "Try to fix errors if found" option selected and click "Start".

Step 3: The software will begin checking your partition file system on your disk. When it has completed, click "Finish".

Method 2. Scan and fix system hard disk error
1. Click Start > File Explorer > This PC;
2. Right-click the hard drive that you need to check and scan > Select Properties;
3. Go to Tools tab > Click Check;

There, the Error Checking tool will automatically check and fix system hard disk error that may cause a Kernel Security Check failure issue in Windows PC.
Method 3. Run Memory Diagnostic Tool to fix the Kernel Security Check failure issue
1. Press Win + R keys to open Run dialog > Type: mdsched.exe and hit Enter;
2. Choose Restart now and check for problems (recommended) to check the status of memory card right now;
Or select Check for problems the next time I start my computer;

3. Then The Memory Diagnostic Tool will automatically run to check errors on Memory card in your PC.

If no errors are checked, your memory card is working perfectly fine with no problem;
If errors are detected, change the current memory card with a new one so to get rid of BSOD with Kernel Security Check failure error.
Method 4. Try System Restore to repair PC from Kernel BSOD issue
1. Boot PC into Safe Mode; (You may follow guidelines in Quick Fix so to boot PC into the Safe Mode.)
2. Click Control Panel on Start > Choose Recovery in All Control Panel Items;
3. Click Open System Restore > Check Choose a different restore point > Next;
4. Select the exact restore point (healthy Windows restore point) which you"ve created previously and click Next > Next to continue;

5. Click Yes to confirm that you want to execute the System Restore operation.
Wait to let the System Restore process complete and then you"ll get your previous Windows system back. There, no Kernel Security Check error or BSOD issue will exist then.
Related Articles - ALSO ON EaseUS SOFTWARE
 Как писать анонимно в Аск фм?
 Лазерная указка расстояние
 Обзор и тестирование беспроводного маршрутизатора ASUS RT-AC66U Описание asus rt ac66u